
Panasonic G shutter count
Panasonic's range of Lumix G-cameras has been steadily expanding since the company launched the Micro Four Thirds standard in September 2008. The original G1 was quickly succeeded by a range of mirrorless system cameras that offered different form factors and functionalities, notably the G, GF, GH, GM, and GX product lines. These mFT cameras are generally well built and can provide good services for a long time. Nevertheless, when buying or selling a used Lumix mFT camera, it is often useful to know the number of shutter releases the camera has performed, as this information can provide an indication on how intensively it has been used. While the cameras use a numbering system for the images they store on the memory card, this counter is not strictly sequential, as it omits large quantities of numbers after certain intervals (in particular, when a new folder is created on the card). Luckily, the true shutter count is stored inside the cameras' memory and can be retrieved by accessing hidden service menus, which are mainly intended for Panasonic service personnel. This shot count represents the number of times the mechanical shutter has actuated, but does not include any images taken with the electronic shutter option that many of the newer Lumix cameras offer.
The procedure to obtain the number of actuations differs slightly between (groups of) cameras, as their button layouts vary. The multiple steps to retrieve the shutter count for the various G, GF, GH, GM and GX cameras are outlined in several distinct sections below. The procedure to follow for Olympus-made Micro Four Thirds cameras is described on a separate Olympus mFT shutter count page. Some steps involve pressing several buttons simultaneously, which can be a bit tricky.
Kindly note that you will perform the procedures outlined below at your own risk and that the unauthorized access of the service menus might void your camera's warranty. Thousands of Lumix shooters have accessed the service menus of their cameras without any issues, but problems have been reported by GH4 and GH5 users who have the optional V-Log L function installed. Apparently, when accessing the Service Mode, the V-Log data first needs to be backed up, so it can be reloaded after the service intervention has been performed. Otherwise, V-Log will be deactivated and requires a fresh installation (with a new V-Log key) to become functional again. So if you have bought the V-Log upgrade, you may prefer to refrain from exploring the service menus. – In case you notice a mistake in the descriptions below, or can provide instructions for cameras not (yet) listed, please drop me a line.
Shutter count on the G1 and GH1
With your camera's battery well charged, perform the following steps in sequence:
- Insert a memory card into the card slot;
- Turn the camera ON and take a picture;
- Turn the camera OFF;
- Select single shot mode;
- Press and hold both the DISPLAY and FILM MODE buttons, while turning the camera ON;
- To move to the actuations menu, press and hold the FILM MODE button, while pressing the MENU/SET and LEFT ARROW buttons simultaneously;
- Again, press and hold the FILM MODE button, together with the MENU/SET and LEFT ARROW buttons. A two-page operation history display will appear;
- Press DISPLAY to toggle between the two information menus;
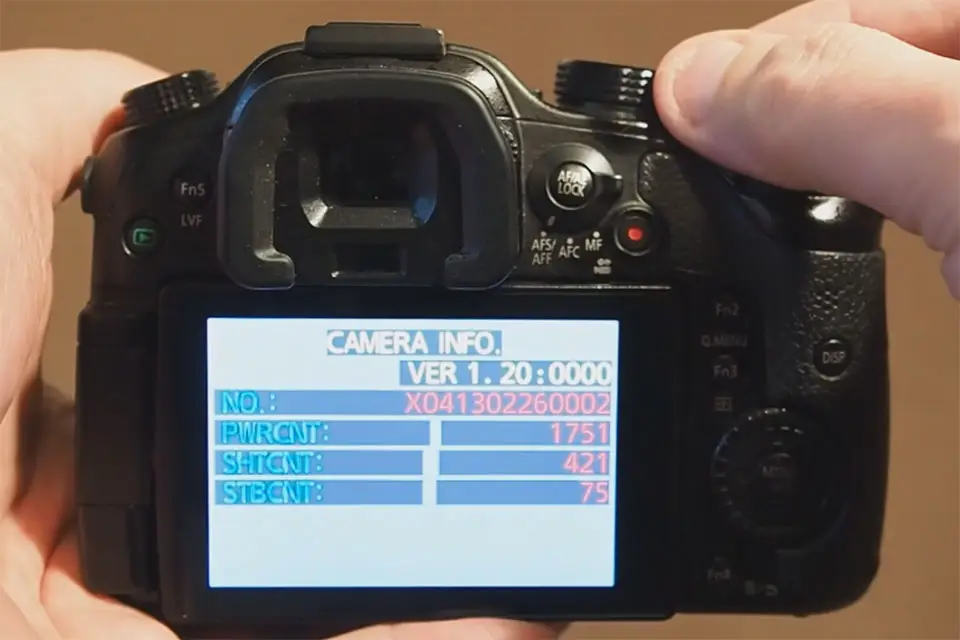
- Write down the number next to PWRCNT. This is how many times the camera has been powered up;
- Write down the number next to SHTCNT. This is the shutter activation count;
- Write down the number next to STBCNT. This is the number of times the flash has fired;
- Switch the camera off to revert back to normal operating mode. Congratulations, you have successfully retrieved the shutter actuations information!
Shutter count on the G2, G10, GH2, GH3 and GH4
With your camera's battery well charged, perform the following steps in sequence. If you have the V-Log upgrade installed on your GH4, please read the corresponding section at the top of this page carefully before proceeding.

- Insert a memory card into the card slot;
- Turn the camera ON and take a picture;
- Turn the camera OFF;
- Select single shot mode;
- Press and hold both the DISPLAY and AF/AE LOCK buttons, while turning the camera ON. You are now entering the Temporary Service Mode, even though you might not notice anything unusual on first sight (in case you would like to verify that you are indeed in Temporary Service Mode, go to the Setup Menu [the one with the wrench symbol] and scroll to the last page where you will find a menu item "ROM BACKUP" that is not displayed in normal operating mode);
- Now, press and hold the AF/AE LOCK button together with the MENU/SET and LEFT ARROW buttons;
- Repeat the last step, that is press and hold the AF/AE LOCK button while pressing the MENU/SET and LEFT ARROW buttons. A two-page operation history display will appear;
- Press DISPLAY to toggle between the two information menus;
- Write down the number next to PWRCNT. This is how many times the camera has been powered up;
- Write down the number next to SHTCNT. This is the shutter activation count;
- Write down the number next to STBCNT. This is the number of times the flash has fired;
- Switch the camera off to revert back to normal operating mode. Congratulations, you have successfully retrieved the shutter actuations information!
Shutter count on the GH5, G9, and G9 II (prior to firmware 2.5)
Please note that Panasonic removed information on the shutter count (as well as power count and strobe count) from the hidden menus of the G9 II with firmware update v2.5. Hence, this information is no longer available to users of the camera with the updated firmware.
If you have the V-Log upgrade installed on your GH5, please read the corresponding section at the top of this page carefully before proceeding. With your camera's battery well charged, perform the following steps in sequence.
- Insert a memory card into the card slot;
- Turn the camera ON and take a picture;
- Turn the camera OFF;
- Select single shot mode;
- Press and hold both the PLAYBACK and AF/AE LOCK buttons, while turning the camera ON. You are now entering the Temporary Service Mode, even though you might not notice anything unusual on first sight (in case you would like to verify that you are indeed in Temporary Service Mode, go to the Setup Menu [the one with the wrench symbol] and scroll to the last page where you will find a menu item "ERR CODE DISP" that is not displayed in normal operating mode);
- Now, press and hold the PLAYBACK button together with the MENU/SET and press LEFT on the clickwheel;
- Repeat the last step, that is press and hold the PLAYBACK button while pressing the MENU/SET and LEFT on the clickwheel. A two-page operation history display will appear;
- Press DISPLAY to toggle between the two information menus;
- Write down the number next to PWRCNT. This is how many times the camera has been powered up;
- Write down the number next to SHTCNT. This is the shutter activation count;
- Write down the number next to STBCNT. This is the number of times the flash has fired;
- Write down the number next to PSVCNT. This is the number of times the camera has automatically shut down due to inactivity;
- Switch the camera off to revert back to normal operating mode. Congratulations, you have successfully retrieved the shutter actuations information!
Shutter count on the Panasonic G3
With your camera's battery well charged, perform the following steps in sequence:
- Insert a memory card into the card slot;
- Turn the camera ON and take a picture;
- Turn the camera OFF;
- Select Manual Mode;
- Press and hold simultaneously the Q.MENU/Fn2, DISP/Fn1, and RIGHT ARROW buttons, while turning the camera ON;
- Now, press and hold the Q.MENU/Fn2 button together with the MENU/SET and LEFT ARROW buttons;
- Repeat the last step, that is press and hold the Q.MENU/Fn2 button, while pressing the MENU/SET and LEFT ARROW buttons. A two-page operation history display will appear;
- Press DISP/Fn1 to toggle between the two information menus;
- Write down the number next to PWRCNT. This is how many times the camera has been powered up;
- Write down the number next to SHTCNT. This is the shutter activation count;
- Write down the number next to STBCNT. This is the number of times the flash has fired;
- Switch the camera off to revert back to normal operating mode. Congratulations, you have successfully retrieved the shutter actuations information!
Shutter count on the G5, G6, G7 (=G70), G80 (=G85), GX1, GX7, and GX8
With your camera's battery well charged, perform the following steps in sequence:
- Insert a memory card into the card slot;
- Turn the camera ON and take a picture;
- Turn the camera OFF;
- Select single shot mode;
- Press and hold simultaneously the DISPLAY, AF/AE LOCK, and RIGHT CURSOR buttons, while turning the camera ON;
- Now, press and hold the AF/AE LOCK button together with the MENU/SET and LEFT CURSOR buttons;
- Repeat the last step, that is press and hold the AF/AE LOCK button while pressing the MENU/SET and LEFT CURSOR buttons. A two-page operation history display will appear;
- Press DISPLAY to toggle between the two information menus;
- Write down the number next to PWRCNT. This is how many times the camera has been powered up;
- Write down the number next to SHTCNT. This is the shutter activation count;
- Write down the number next to STBCNT. This is the number of times the flash has fired;
- Switch the camera off to revert back to normal operating mode. Congratulations, you have successfully retrieved the shutter actuations information!
Shutter count on the GX80 (=GX85) and the GX9
With your camera's battery well charged, perform the following steps in sequence:
- Insert a memory card into the card slot;
- Turn the camera ON and take a picture;
- Turn the camera OFF;
- Select single shot mode;
- Press and hold simultaneously the PLAYBACK, AF/AE LOCK, and RIGHT CURSOR buttons, while turning the camera ON;
- Now, press and hold the AF/AE LOCK button together with the MENU/SET and LEFT CURSOR buttons;
- Repeat the last step, that is press and hold the AF/AE LOCK button while pressing the MENU/SET and LEFT CURSOR buttons.
- Write down the number next to PWRCNT. This is how many times the camera has been powered up;
- Write down the number next to SHTCNT. This is the shutter activation count;
- Write down the number next to STBCNT. This is the number of times the flash has fired;
- Switch the camera off to revert back to normal operating mode. Congratulations, you have successfully retrieved the shutter actuations information!
Shutter count on the GX800 (=GX850)
With your camera's battery well charged, perform the following steps in sequence:
- Insert a memory card into the card slot;
- Turn the camera ON and take a picture;
- Turn the camera OFF;
- Select "P" (PROGRAM AE MODE);
- Press and hold simultaneously the PLAYBACK, QUICK MENU/RETURN, and RIGHT CURSOR buttons, while turning the camera ON;
- Now, press and hold the PLAYBACK button together with the MENU/SET and LEFT CURSOR buttons;
- Repeat the last step, that is press and hold the PLAYBACK button while pressing the MENU/SET and LEFT CURSOR buttons.
- Write down the number next to PWRCNT. This is how many times the camera has been powered up;
- Write down the number next to SHTCNT. This is the shutter activation count;
- Write down the number next to STBCNT. This is the number of times the flash has fired;
- Switch the camera off to revert back to normal operating mode. Congratulations, you have successfully retrieved the shutter actuations information!
Shutter count on the Panasonic GF1
With your camera's battery well charged, perform the following steps in sequence:
- Insert a memory card into the card slot;
- Turn the camera ON and take a picture;
- Turn the camera OFF;
- Select single shot mode;
- Press and hold both the DISPLAY and AF/AE LOCK buttons, while turning the camera ON;
- To move to the actuations menu, press and hold the DISPLAY button, while pressing the MENU/SET and LEFT ARROW buttons simultaneously;
- Again, press and hold the DISPLAY button, together with the MENU/SET and (LEFT ARROW buttons. A two-page operation history display will appear;
- Press DISPLAY to toggle between the two information menus;
- Write down the number next to PWRCNT. This is how many times the camera has been powered up;
- Write down the number next to SHTCNT. This is the shutter activation count;
- Write down the number next to STBCNT. This is the number of times the flash has fired;
- Switch the camera off to revert back to normal operating mode. Congratulations, you have successfully retrieved the shutter actuations information!
Shutter count on the Panasonic GF2
With your camera's battery well charged, perform the following steps in sequence:
- Insert a memory card into the card slot;
- Turn the camera ON and take a picture;
- Turn the camera OFF;
- Select single shot mode;
- Press and hold simultaneously the Q.MENU/Fn2, PLAY, and RIGHT ARROW buttons, while turning the camera ON;
- Now, press and hold the Q.MENU/Fn2 button together with the MENU/SET and LEFT ARROW buttons;
- Repeat the last step, that is press and hold the Q.MENU/Fn2 button while pressing the MENU/SET and LEFT ARROW buttons. A two-page operation history display will appear;
- Press PLAY to toggle between the two information menus;
- Write down the number next to PWRCNT. This is how many times the camera has been powered up;
- Write down the number next to SHTCNT. This is the shutter activation count;
- Write down the number next to STBCNT. This is the number of times the flash has fired;
- Switch the camera off to revert back to normal operating mode. Congratulations, you have successfully retrieved the shutter actuations information!
Shutter count on the GF3, GF5, GF6, and GF7
With your camera's battery well charged, perform the following steps in sequence:
- Insert a memory card into the card slot;
- Turn the camera ON and take a picture;
- Turn the camera OFF;
- Select single shot mode;
- Press and hold simultaneously the PLAYBACK and Q.MENU and RIGHT ARROW buttons, while turning the camera ON;
- To move to the actuations menu, press and hold the PLAYBACK button, while pressing the MENU/SET and LEFT ARROW buttons simultaneously;
- Again, press and hold the PLAYBACK button, together with the MENU/SET and (LEFT ARROW buttons. A two-page operation history display will appear;
- Press PLAYBACK to toggle between the two information menus;
- Write down the number next to PWRCNT. This is how many times the camera has been powered up;
- Write down the number next to SHTCNT. This is the shutter activation count;
- Write down the number next to STBCNT. This is the number of times the flash has fired;
- Switch the camera off to revert back to normal operating mode. Congratulations, you have successfully retrieved the shutter actuations information!
Shutter count on the GM1 and GM5
With your camera's battery well charged, perform the following steps in sequence:
- Insert a memory card into the card slot;
- Turn the camera ON and take a picture;
- Turn the camera OFF;
- Press and hold simultaneously the PLAY, TRASH, and RIGHT buttons, while turning the camera ON;
- Now, press and hold the PLAY button together with the MENU/SET and LEFT buttons; A first set of service menus will appear.
- Repeat the last step, that is, press and hold the PLAY button, while pressing the MENU/SET and LEFT buttons;
- Write down the number next to PWRCNT. This is how many times the camera has been powered up;
- Write down the number next to SHTCNT. This is the shutter activation count;
- Write down the number next to STBCNT. This is the number of times the flash has fired;
- Switch the camera off to revert back to normal operating mode. Congratulations, you have successfully retrieved the shutter actuations information!
Further Reading
In case you are thinking of upgrading your mFT system, you might be interested to have a look at the MFT lens compendium, which lists all the AF and MF lenses available for the mount. Moreover, if all the marketing terms and expressions around new cameras and lenses is getting you a little confused, check out the mFT glossary for explanations.
You are here: Home » Panasonic MFT Cameras » Lumix MFT Shutter Count